Use of the air conditioning system. Typical monitor malfunctions The hover control display does not turn on
15.02.2014
I know from experience that the most unpleasant and time-consuming troubleshooting is “incomprehensible” malfunctions. Such that when the owner of the car begins to list them, there is a feeling of unreality: “This cannot be!”. Because illogicality creeps out of every word.
Well, judge for yourself, I'll give you the last example: a 2007 GREAT WALL Hover car. The problem began to arise gradually: a man was driving and driving, and he wanted to lower the window, it was hot. Mechanically and without being distracted from the road, he pressed the power window button and the car immediately jerked and stalled. He didn't understand. I looked at the instrument panel, on the sides - everything is fine. Only it is extremely incomprehensible ... the man started the engine again and drove off. And then he recalled this incident and told his friends as something extremely surprising: “This cannot be, but it happened - I’ll tell you now ...”.
And he would have forgotten about this incident, and would not have remembered - if this had not happened again: he wanted to open the window, pressed the button, and the car died once. And here he was no longer surprised, but had to be nervous and think that it might be time for him to go to a car service and deal with this incomprehensible problem.
But in life, as it happens: "Until the roasted rooster pecks." And the malfunction inside the car lived, developed until one more thing happened - incomprehensible, mysterious and disturbing: during the trip, I pressed the brake, and the car picked up and stalled ... release the brake, start the engine again - you drive as if nothing had happened . So there is only one conclusion: “To the car service! Yes, hurry up.
From own experience in troubleshooting these "mysterious" faults, I know that when a fault is tagged "incomprehensible, illogical, mysterious", then the problem may lie in the automotive electrician.
I always look with curiosity at the client, to whom you will tell about the cause of the malfunction, show its place and name the price for the work. Another wonders, they say, why is it so expensive? ..
"Expensive" is relative. I understand that everyone does what they do and wants to get adequate money for their work. And the search for an “incomprehensible, mysterious, illogical” malfunction is approximately the same as throwing a needle into a pile of sand on a KAMAZ truck, dumping this sand on the ground and saying: “Now let's find this needle” ...
Of course, there is a certain and many years of experience in finding such malfunctions, so I can show where I started looking for a malfunction:

This is the driver's seat and everything around it. Why: this is where all the information and power circuits of the car pass. And when the malfunction is "incomprehensible and mysterious", then you can assume a bad contact somewhere, a bad "mass" and the like. And what do you think, how many contacts, connection points can be located in the space shown in the photo above? Not ten, for sure. But the figure "one hundred or more" is already closer to the truth. And each contact, connector, junction needs to be inspected, examined, and made sure that it works.
Unfortunately, at that time I had certain difficulties called "information hunger" and a specific scheme for specific sections electrical circuits could not find. And it's not "surprising". Probably only dealers can have full information, and we, private automobile entrepreneurs, have to dodge somehow.
However, not everything is so bad. I know that the Legion-Avtodata company has been developing and promoting its Motordata program for many years. But I won’t lie: at that time I didn’t have the necessary electrical circuit this car:

This scheme came to me later. And that's what I thought: "if this shemka was at that time, then the troubleshooting would take much less time."
Well, I began to clarify the problem and look for this mystery in the appearance of a malfunction. I started with the ignition switch, then moved on to checking the fuses under the hood, the fuse box in the cabin. Then the doors ... burn ...
There are different ways to identify a problem. In the initial training courses of the same Toyota, it is written about them: “Checking for fragility ... for bending ... for vibration". And at some point I discovered that when one of the harnesses of the driver's door was stirred and broken, the power was lost. I looked more closely: the harness under the lining of the left pillar at the driver's feet:

More specifically, the problem rests on this connector:

First theoretically, then practically figured out this place. And when he took it apart, he nodded with satisfaction: “This is it ...”:

Some contacts looked more or less normal:


… and some simply rotted away:

Here is the "mysterious" problem. In principle, “everything is very simple” - if you have many years of experience and a day in reserve. Or "two days + infinity" - depending on the complexity of the task.
To clean, clean the connector and the remaining contacts from the "green" work is thankless and unnecessary. You don't have to leave it like that. Therefore, I made new connections with a different connector.
The question remains: How could this happen? How can this be avoided?" So, like this: the car was not a "drowned" and "green" on the contacts and connectors could not appear from this. Where then?
As an option, I can offer this: "Violation of factory technology." What exactly? Inaccurate dimensions of parts, for example. If the "dad" enters the "mother" and has at least some kind of gap, then in this place - provided that a large current flows there, a so-called "vulnerability zone" is created, provoking soot on pads and as a result, poor conductivity - which increases the current, creates excess heat; then comes local heating, reflow, and here it is - a “mysterious” malfunction. And moisture on the contacts gets through the slots of the seals of the connectors. All this together creates such a dangerous cocktail that will definitely come out along with an “incomprehensible and strange” malfunction. And it’s good if everything, as in this case, will cost “little blood”. But it could have happened differently: due to poor contact, the current strength will exceed the maximum permissible value, which can provoke such a strong local heating that will lead to melting and ignition. Do you agree with me?
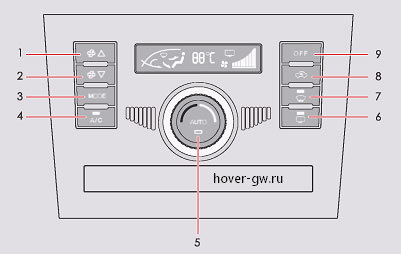
Air conditioner control panel
Another variant

1. Compressor switch. 2. The switch of modes of air circulation in salon. 3. The switch of a mode of an obduv of a forward windshield. 4. The switch of a heater of a back windshield. 5. System switch button. 6. Temperature control knob. 7. The switch of a mode of an obduv "on glasses and legs". 8. The switch of a mode of an obduv "on the face and legs". 9. Automatic mode switch. 10. The switch of a mode of an obduv "on the person". 11. The switch of a mode of an obduv "on feet". 12. Air flow adjustment knob.
Air conditioner option with automatic control
1. Button to increase air flow. 2. Air flow reduction button. 3. Mode switch button. 4. Compressor switch. 5. Automatic mode switch. 6. The switch of a heater of a back windshield. 7. The switch of a mode of an obduv of a forward windshield. 8. Switch button for circulation modes. 9. System switch button.
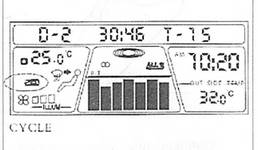
Universal display
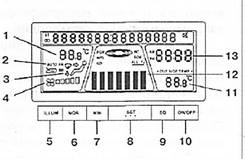
1 - Set air temperature inside the passenger compartment; 2 - Indication of the automatic mode of operation of the air conditioner; 3 - Indication of ventilation mode; 4 - Indication of the intensity of the air flow of the fans; 5 - Display screen backlight brightness control; 6 - Button for setting the time "hours"; 7 - Button for setting the time "minutes"; 8 - Button for fixing the time setting; 9 - Button to turn on the equalizer; 10 - Button for turning on the outdoor temperature indication; 11 - Indication of outdoor air temperature; 12 - Equalizer; 13 - Indication of time.
Air conditioner control
1. Airflow adjustment buttons
By pressing the airflow intensity buttons, you can set one of 10 fan speeds, which will be shown on the scale on the display. Each time you press the Up Arrow and Down Arrow buttons, the fan speed will change one step up or down respectively. The scale on the display screen changes accordingly. Different display scale values correspond to different ventilation rates:

1-2: Corresponds to 1 column of the scale.
3-4: corresponds to 2 columns of the scale.
5-6: corresponds to 3 columns of the scale.
7-8: corresponds to 4 columns of the scale.
9-10: corresponds to 5 columns of the scale.
2. AUTO button
Pressing the AUTO button turns on auto mode air conditioner operation. At the same time, the indication of the “AUTO” mode is displayed on the display screen, and the indicator on the button lights up. In this mode, in accordance with the set temperature value, the air conditioner automatically controls the operation modes of the ventilation dampers, maintaining the temperature, the intensity of the ventilation air flow, turning on the compressor. All values on the universal display screen corresponding to the mode are also updated automatically.
3. Stop button OFF
When this button is pressed in any air conditioner operation mode, the airflow rate indication is cleared from the display screen, and the air conditioner power indicator goes off.
4. Temperature setting buttons (TEMP)
When the fans are on, you can set the desired temperature inside the car by pressing these buttons. Adjustment range: 17-32 "C. Each time you press the button with an upward arrow, the set temperature increases by 0.5" C. Each time the down arrow button is pressed, the set temperature decreases by 0.5°C. When these values are changed, the set temperature indication on the universal display screen changes automatically.

5. Heated glass button (FRT)
After pressing this button, “FRT” appears on the display screen. The system starts to work in the glass heating mode (from fogging). The indicator on the button lights up. The ventilation dampers are installed in the position for glass heating. Pressing the button again disables this mode. The indication is removed from the display screen and the indicator on the button goes out. When this mode is activated, fresh outside air begins to flow through the vents on the dashboard onto the windshield. The indicator on the switch button is on at this time.

6. Heated rear window(RR)
Pressing this button turns on / off the rear window heater. The heater switches off automatically after 10 minutes. after starting work. It can also be turned off manually at any time. After turning on the heater, the corresponding indicator lights up. By pressing the button again, the heater is turned off and the indicator goes out.
7. MODE button
By successively pressing the MODE button, the operation modes of the fan dampers are switched over in a cycle: "head blowing" - "bidirectional blowing" - "legs blowing" - "head blowing". When switching on the display screen, the indication changes accordingly.

8. Air conditioner switch button (A/C)
The A/C button turns the A/C compressor on or off. The corresponding indicator lights up. This button controls the start and stop of the air conditioning system. The button has an operating mode indicator. When the compressor is running, the indicator is on, when the compressor is turned off, the indicator goes out. But when you turn on the heated glass button described above, the A / C button turns on automatically.

The intensity of the air flow of the fans is set to the maximum value by default.
9. Button for switching internal, external air circulation
This button sequentially switches between internal and external modes air circulation. At the same time, the corresponding indicator lights up (or goes out). The corresponding graphic indication is displayed (or removed) on the display screen.
10. Max Cooling function
When setting the set temperature value to +17 "C, the system switches on the maximum cooling mode.
11. Max Heating Function
When setting the set temperature value to +32 "C, the system switches on the maximum heating mode.
12. When the automatic air conditioning systems are regulated by the environmental conditions in the car, which allows the driver and passengers to feel comfortable. A/C on/off times and compressor cycle times may vary slightly depending on engine speed and output power.
13. Quick setting of the set temperature of the air in the cabin
When the “AUTO” button is pressed, the minimum value of the set temperature is automatically set - +17 "C. The air flow intensity is set to the maximum. When the maximum set air temperature is set - + 32" C - the flow rate is also maximum, which ensures that the set temperature is quickly reached, after which the mode of internal air circulation in the cabin is switched on.
14. Illumination Intensity Adjustment Button (ILLUM)
Each time this button is pressed, the backlight intensity of the display screen increases by one value, and the corresponding indication is displayed on the screen itself - from 0 to 5. A value of 5 corresponds to the maximum brightness of the backlight. After the next press, the backlight intensity is set to 0.
15. Buttons for setting the time on the clock (SET), (HOR), (MINI)
(1) If you press and hold the clock SET button for about 2 seconds, the numbers on the clock screen will flash. In this case, you can set the time values.
(2) Each time you press the HOR button, the hour display advances by one hour. Each time you press the MIN button, the minute display advances by one minute. After setting the set time value, press the SET button again.
(3) Pressing the SET button once cycles through the time format from 12-hour to 24-hour.
16. Equalizer button (EQ)
This button can switch Various types preset equalizers. Each press of the button switches the equalizer types in the following cycle: “low-high” (B-T), “monotone” (FLAT), “jazz” (JAZZ), “pop music” (POP), “classical” (CLASS) ), "rock music" (ROCK), "vocal" (VOCAL).
17. Outdoor temperature display switch button (ON/OFF)
The ON / OFF button located on the air conditioner panel can turn on or off the indication of the outside temperature. The temperature value displayed on the screen will correspond to the temperature of the air surrounding the moving vehicle.
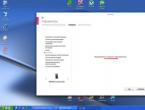
In most cases, the reason that the monitor does not turn on or there are problems with the image is the incorrect operation of the video card, incorrectly set settings, or incorrect connection.
The simplest check:
- Disconnect all wires from the monitor
- Connect only the power cable
- The monitor should turn on. The display shows "No Signal"
After a while, the monitor enters the power saving mode - “Stand by” (the power indicator changes color, the picture disappears)
In this case, the monitor is most likely OK. Of course, there are possible exceptions.
You can also check the health of the monitor by connecting it to another computer.
If the monitor has proven to be inoperable, you should contact the service for diagnostics and repair. Our article will tell you what to look for when describing a problem, so that when you telephone conversation you correctly orientated on the price and terms of repair.
Before calling the workshop, find out the exact name of your monitor model. A number of models have standard faults that have long been known to employees of service centers.
Monitor does not turn on, power indicator is off
If the monitor does not show any signs of life, the problem is probably in the power supply. Most often, this breakdown is easily fixed.
There may be a problem with the monitor's power cable or connectors. In this case, if you change the position of the power cord, the indicator may light up momentarily when contact is made. In case of complete inoperability, the power supply unit will most likely need to be repaired.
Power light blinking, no picture
Flashing of the voltage indicator (cyclic power on-off) regardless of the position of the cord - a signal of incorrect operation of the power supply or the main board (main board).
The service center will determine the cause of the problem and eliminate it.
Power indicator is on - no image, backlight is on
Most likely the problem is in the processor board (MB) of the monitor. For diagnostics, you will have to contact the service, since such “symptoms” do not allow you to immediately determine the cause of the malfunction. The master will be able to give an exact answer only after examining the disassembled monitor.

Monitor backlight does not light up or goes out after a few minutes of operation
Sometimes the picture can be seen in reflected light, when looking at the monitor from above, from the side. The monitor responds to buttons, there is access to the menu. It is possible that immediately after turning on the monitor works, and after a few minutes the backlight turns off. The problem is in the inverter or in the backlight lamps: they burn out over time or can fail abruptly as a result of mechanical influences (for example, shock). Repair consists in replacing the lamps or the converter. For this procedure, it is worth choosing a service meticulously: the procedure is complex, requiring a certain skill level and increased accuracy from the master.
Decreased screen brightness and a reddish tint
These symptoms indicate the burnout of the backlight, as in the previous case. The dimming and reddish tinge may only occur in a specific area of the screen or across the entire monitor. The problem is solved by replacing the lamps, and various dark screen savers and monitor sleep settings serve as a preventive measure. The fewer nights the monitor is idle with a static picture on, the longer the lamps will last.
Stripes on the screen
The appearance of vertical or horizontal stripes on the monitor screen is a sign of a malfunction of the decoder loops. If the stripes change location, then the problem may be in the video card, and if the stripes have a constant localization and color (black, white, color), then the problem is in the monitor matrix. For the replacement of master cables in service centers are practically not taken, since there is no confidence in the success of the operation and that the problems will not return after a short time. The only solution to the problem is to replace the die assembly. If your monitor is under warranty, immediately after the appearance of the bands, contact the service, even if there is only one band so far and it does not bother you.
If stripes appear on a monitor whose warranty period has already expired, check with the service center for the cost and estimated repair time for your model. You must have the original matrix, and the cost can be comparable to buying a new monitor.

Image or color distortion
Usually occurs due to loss of contact in the signal cable or broken connectors. Check the signal cable(VGA,DVI) by replacing.
The DVI (digital) cable can only be switched (!!!) on a de-energized monitor!!!
If the defect persists, then this is most often associated with either incorrect work video cards, or with a breakdown of the monitor's processor board. In some cases, it can be fixed by flashing.
The master will be able to name the exact cause of the malfunction and the cost of repair only after the diagnosis.
The monitor does not display an image from the computer, displays messages
If instead of the usual picture, the monitor displays a service message (“check the cable” or “non-optimal mode”), and this state does not change after the corresponding changes (replacing the cable, setting the required mode), most likely the problem is in the monitor. A number of monitor models with a MICOM processor (Samsung 710 (N/V), 713/913, some Philips, LG) have standard fault associated with the rapid failure of the processor. Repairing or replacing the failed processor completely fixes the problem.
Malfunctions of LED monitors
LED monitors differ in the type of backlight: LEDs are used instead of lamps. LED failure, which manifests itself as a decrease in brightness in a separate area of the screen, is quite rare and can be successfully repaired.
Please note that the slight uneven backlighting of the LED monitor in budget models found already at purchase. At the same time, the center of the screen is illuminated more than the edges. This is due to the use of cheap materials to create the scattering layers of the screen. Not ideal color reproduction is also a feature of LED monitors, they are simply not designed for professional color work.
One of frequent breakdowns LED-monitors - flickering of the screen, which becomes noticeable when the brightness is reduced. For some models, the repair is limited to flashing, for others, a replacement of the processor board is required.