What should be the mouse setting. Adjusting mouse settings in Windows
The laptop has a built-in mouse - a touchpad (touchpad), which usually does not need additional configuration. However, some tasks using the touchpad are inconvenient to perform: for example, working in a graphics editor. In this case, instead of the touch panel, you can use a wired or wireless mouse that connects via bluetooth.
Turning on the touchpad
Before you can use the touchpad, you need to turn it on. Depending on the manufacturer of the laptop, different keyboard shortcuts are used. To turn on touch mouse on an ASUS laptop, press Fn+F9. If you have an Acer, then use the combination Fn + F7 to activate the touchpad.
To understand which button to press to turn on touch mouse on a laptop, look closely at the keyboard. Look for the touchpad icon in the F1-F12 key row. In combination with the Fn key, this button enables/disables the touch mouse.
Connecting a wired mouse or wireless device Bluetooth doesn't usually cause problems either. The main thing is to check that the bluetooth on the laptop is turned on if you are using wireless equipment.
Mouse settings
It doesn't matter what mouse you use on your laptop - touch, wired, wireless, connected via bluetooth. To set it up, you must follow the same steps:

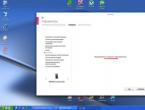
In the properties of the input device, you will see four tabs that allow you to configure how the mouse works on the laptop. On another tab (Hardware), you can view information about the connected device. On ASUS laptops, Acer and some others, there is also an "ELAN" tab for setting up multi-gestures. 
If you are using a wireless mouse, then the Bluetooth connection will be indicated in the "Placement" line. The screenshot shows that the laptop works with a conventional wired mouse. Let's take a look at the rest of the tabs in turn: find out what can be configured on them.
Mouse buttons
If it is more convenient for you to work with the mouse with your left hand, then you can configure the reassignment of the buttons (the left one will perform the functions of the right one and vice versa). The type of mouse does not matter: it is connected via bluetooth, USB or built into the laptop in the form of a touch panel. 
Below there is a slider to adjust the double click speed. If you do not have time to click on the button to open the folder, set the slider to the minimum value. Hover over the folder icon and see if it's more convenient for you to work. You can also configure sticky buttons on this tab.
Pointers
If you don't like how the cursor looks in different situations, you can customize its appearance in the "Pointers" tab. 
There are two options for changing the cursor:
- Use one of the standard schemes.
- Assign a pointer to each situation manually.
Pointer options
Much more important appearance pointer parameters of its work on a laptop or computer. On the tab of the same name, you can specify the speed of movement, the starting position, the need to display the trail, etc. 
Be sure to turn on the increased pointer accuracy - this option will help you hit even small interface elements.
Wheel
The last tab of parameters we are considering is called "Wheel". There are only two options that can be configured:

The last parameter does not work on all mice. If you have the simplest input device, in which the wheel does not tilt to the sides, then you will not be able to scroll the screen horizontally.
12.10.2009 20:51
Majority Windows users know how to change the appearance of the mouse pointer. But almost no one adjusts mouse settings such as double-click speed or mouse pointer speed. And in vain. After all, a properly configured mouse significantly improves the convenience of working at a computer.
To start customizing your mouse, open Control Panel -> All Control Panel Items -> Mouse.
Mouse buttons tab

Swap button assignments. If you enable this function, then the left mouse button will perform the functions of the right, and the right button - the functions of the left.
Double click execution speed. Move the slider and adjust the double-click speed by clicking on the folder icon next to the slider.
Sticky mouse button. If you enable this feature, you can drag and drop files and folders without holding down the button. It is enough to keep the mouse button pressed for a few seconds and the selected object will “stick” to the mouse pointer. To "release" an object, you need to make a click. The same goes for window scaling. The time required to activate sticking can be adjusted by pressing the button Options and moving the slider.
Pointer Options tab

moving. Using the slider, you can speed up or slow down the movement of the mouse pointer on the screen. The higher the resolution of the screen, the slower the mouse pointer moves, which leads to unnecessary tension and increased wrist muscle fatigue. Adjust the pointer speed so that the mouse pointer moves easily along the entire diagonal of the screen with one movement of the hand along the entire diagonal of the rug. If you set the maximum move speed, but the mouse pointer moves slower than necessary, then uncheck Enable enhanced pointer precision, this will speed up the mouse even more. A very useful feature in this era of large monitors and high screen resolutions. It is strange that almost no one sets this parameter!
Home position in the dialog box. Each dialog box has several buttons, one of which is selected by default (the button that the user is most likely to use). The default button is highlighted in blue in Windows 7. If you want to open dialog boxes mouse pointer has always been automatically positioned on the default button, then activate this option. A handy feature once you get used to it.
Visibility. Here you can adjust the visibility of the mouse pointer:
- Display the trail of the mouse pointer;
- Hide the pointer while typing;
- Indicate the location of the pointer when pressing the Ctrl key.
Experiment with these options and turn on the ones you want.
Wheel tab

Here you can adjust the speed of horizontal and vertical scrolling of text documents, web pages and other windows using the wheel.
Vertical scroll. You can set the number of lines to be rewound when the wheel is turned one click. If you set the value to one screen, then turning the wheel one click will be equivalent to pressing the Page Up or Page Down button on the keyboard.
Horizontal scroll. This setting is for mice that support horizontal scrolling by tilting the wheel. You can set the horizontal scrolling speed by setting the number of characters to scroll.
Pointers tab

Perhaps this tab is familiar to most users. Windows is better all other tabs. After all, here you can change, add and remove the display scheme (type) of the pointer.
To select one of the system schemes, use the drop-down list Scheme. An open diagram can be modified using the area Setting. Highlight the mode and use the button Review change the view of the pointer in this mode.
To remove an installed schema, select it from the drop-down list and click the button Delete. System (preinstalled) schemes cannot be deleted.
Some topics Windows design 7 change the appearance of the mouse pointer. To prevent themes from doing this, uncheck Allow themes to change mouse pointers.
To disable the shadow cast by the mouse pointer, uncheck Enable mouse pointer shadow.
Hardware tab

This displays information about the status of the device and the mouse driver. Pushing a button Properties, you can update, uninstall, or roll back the driver and see more information about the mouse, as if you were opening the properties of the mouse in Device Manager.
Additional Mouse Features
Fast scrolling through long documents
To enable fast scrolling of a web page, or text document in the Word editor, press the wheel and move the mouse up, down, or sideways.
Special abilities

To configure mouse accessibility, open Control Panel -> Center accessibility and press Making the mouse easier(Change settings for a mouse or other pointing device).
Once I already wrote about how to set up an A4Tech WOP-35 mouse on Windows, but in the comments to this article it turned out that there is an even simpler solution. Dear leomaks leomaks said that the utility can help us with this X-Mouse Button Control, which allows you to customize any button on any mouse the way we want! ~ Just a warning in advance, those who hope to see the setting of horizontal scrolling with the second wheel here, I have to disappoint you. I don't have this recipe yet. Perhaps this one will help, but I haven’t tried it myself, so I don’t promise. ~ In the comments to the above article, it was suggested that in order for both scroll wheels and five buttons to work normally, you need to install the driver from the off site that I used to, By the way, I didn't find it. Here is a direct link to it - http://www.a4tech.com/driver/iWheelZoomA780_RP2W5KB.zip
As stated on the program page, X-Mouse Button Control supports both 32-bit (x86) and 64-bit (x64) releases of Windows XP and later versions of Windows - 2000/XP/2003/Vista/2008/7. The requirements stated on the manufacturer's website include the mouse itself and a driver that supports 5 buttons. Although setting X-Mouse Button Control On a clean, freshly installed Windows 7 (x86) system, I didn't need to install any drivers to set up the extra buttons on my A4Tech WOP-35 mouse. Everything worked right away! This is probably due to the fact that the standard mouse driver for Windows already supports 5 buttons.
The program is free, and its installer weighs only 3.9MB, so for those who still do not unlimited Internet won't be too hard. It is also worth noting that in this article we will consider the utility version 2.3.
First you need to download X-Mouse Button Control and install it. The installation is completely standard.


Installation prompt, license agreement, installation directory selection…
Only the fourth dialog box is not quite standard. Here you can select the directory where the program will save its settings and logs. And this is great, because usually, after reinstalling the operating system, the settings of all programs are lost, and in this case, you just need to install the program and point it to the directory with configs, and it will pick up the already configured profiles. A trifle, but nice 😉 You just need to understand that the settings should be stored on a partition (disk) that you do not format when reinstalling the system.

Further, everything is the same as usual - the process of unpacking and installation, and finally the proposal to run the newly installed software. Also, after pressing the “Finish” button, the program page will open in your standard browser.


After installation X-Mouse Button Control The computer does not have to be restarted, although it is still better to do so. After all, after doing one thing, you usually need to gather your thoughts in order to move on to another activity? What's wrong with your pet?

In the system tray, the icon of our utility looks like in the picture above and if you click on it, we will see the following window.

And this is how exactly the event that happened on the mouse will be highlighted. That is, if you click the left mouse button, then the selector that indicates the action for this button will be highlighted. Thus, we can easily and “scientifically poke” configure all the buttons.

This is how my configured program for two additional buttons looks like.
As you can see, my left side button performs the action “Copy” (Ctrl + C), and the right one “Paste” (Ctrl + V). The problem arose with the setting of the second wheel. X-Mouse Button Control perceives it in the same way as the main one.

It is also possible to set up different profiles for various programs. That is, in each program, the mouse buttons can react differently, as you would like. To do this, you need to click the “Add” button and select the application for which you will set up a new profile.


To apply all the settings, you need to click on the “Apply” button, which is what it means in English 😉
If I didn’t take into account something or described something incorrectly, write about it in the comments, I will correct / supplement.
On this, allow me to bow! Thank you for your attention. Goodbye.
toxins» 20-03-2015 16:55:48
MouseTest is a mouse testing program.
 Screen
Download from our server: http://serviceplus.in.ua/downloads/software/MouseTest/MouseTest.zip (v0.1.4)
Download from site: http://enotus.at.tut.by/Files/MouseTest.exe (usually up-to-date version)
We read the "Conference Rules" before creating a message / topic
toxi Administrator
Messages: 477 Registered: 12-04-2008 06:58:25 Where: Ukraine, Zhytomyr What's your gender: Male Mobile operator: Kyivstar, Life Mob model. phone: Samsung C5212 Duos Surname: Pavlovsky Name: Novel Surname: Olegovych Operating system: Win 7 Linux Ubuntu Internet browser: Avant Browser, Google Chrome
to come back to the beginning
In this tutorial I'll show you how to add and remove double mouse click.
How to double click the mouse
It is very easy to do this.
We go to any of the folders on the computer. IN top menu go to "File ->

This is for Windows 10. previous versions Windows instead of this item will be "Organize -> Change folder and search options".

If you are not looking for an easy way, then you can go to the "Control Panel", then in the category view mode, go to "Appearance and Personalization" and click on the link "Explorer Options" (Folder Options).

All this will lead to the opening of a new window, where on the "General" tab in the "Mouse clicks" block, you just need to change the setting to "Open with one click, select with the pointer."

Additional settings "Underline icon labels" and "Underline icon labels on hover" are responsible for underlining the names of files and folders.
In the first case, it will always be there, and in the second case, only when you hover the mouse cursor.

Now, to select a file or folder, just hover over them with the mouse, and to open or run, you need to click only once instead of two.
How to remove mouse double click
In order to return everything as it was, you need to select the item “Open with a double click and select with one click” in the mouse click settings. Those. again go to "File -> Change folder and search options" (Organize) and select the desired item.

Everything will work as before. Double click instead of one will open folders and files, and one click just select them.
There are cases when these manipulations do not help and the computer still has a single mouse click instead of a double one.
To get rid of this, you can try removing the device from your computer. Right-click on the "My Computer" icon and go to "Properties".


After that, we completely restart the computer. While loading Windows device must be reinstalled.
If none of the suggested methods help, then go and buy yourself a new mouse, because most likely the problem is in it.
How to download a video tutorial from the site
How to adjust mouse settings in Windows 7
 On computers running on the Windows operating system, the main control device is the mouse. The principle of its operation is based on the registration of movements and their transfer to the operating system for synchronous displacement of the pointer on the screen.
At the base of the optical-mechanical mice there is a ball-based rolling unit, the rotation of which is transmitted to the measuring system. The measured value and direction of displacement of the device is transmitted to the computer.
Optical mice, unlike optical-mechanical ones, do not roll on the surface, but slide over it, evenly illuminating it with a beam of rays. The reflected beams are registered by a sensitive element. The mouse, as it were, "sees" the microroughness of the surface and registers its displacement relative to them.
The mouse family also includes other devices such as trackballs and touchpads. The trackball is stationary, and its motion sensor - a ball - rotates with your fingers.
Trackballs, like mice, are optical-mechanical and optical.
The touchpad is a touch pad. To move the pointer, you just need to swipe your finger over it. Typically, touchpads are used in portable computers - laptops.
Buttons are used to issue commands with the mouse. A standard mouse has only two buttons: the main (usually left) and special (usually right). If the mouse has other controls - buttons, wheels, etc. - they should be considered additional and optional.

To configure the mouse and its analogues, use the Properties: Mouse dialog box.
To open it, double-click the Mouse icon in the Control Panel window (Start-Control Panel).
The most important settings for the mouse are setting its sensitivity and setting the double-click of the main button. Selection optimal settings depends on features specific model, as well as from the usual style of work.
The sensitivity of the mouse determines how much the on-screen pointer moves when the mouse is moved once. See if you can move the pointer diagonally across the entire screen without lifting your wrist from the table surface, that is, moving only your fingers. If this exercise does not work, then the sensitivity of the mouse leaves much to be desired and it needs to be increased. The reverse operation - desensitization - may be required when people who are not quite familiar with the system's reaction to their actions, such as small children, work with the computer.
Adjusting mouse sensitivity
- Open the mouse properties dialog box: Start - Control Panel Mouse.
- Click the Pointer Options tab.
- Mouse sensitivity is set using the slider Set the pointer speed on the Move panel. The more to the right the cursor is, the more sensitive the mouse is, the farther the pointer moves at a unit displacement of the device.
- It is also recommended to select the Enable enhanced pointer precision check box. With this setting, the pointer moves slowly at first and then accelerates. This improves accuracy over short distances, which is important in application programs, for example, in graphic editors. In active PC games where the mouse is used to point the weapon at the target, this setting can have a negative effect by slowing down the reaction speed of the player.

A double click is recognized by the time elapsed between two successive presses of the main mouse button. If it is too small, two clicks are accepted and processed. operating system like one normal click. If the interval is too long, the system perceives two different clicks. The time interval at which the system registers a double click has a certain tolerance and can be configured.
Double click setup
- Open the mouse properties dialog box: Start - Control Panel - Mouse.
- Double-click settings are configured in the Double-click speed panel. The folder icon next to it is the scan area. If two consecutive clicks are treated as a double click, the folder's state changes - it opens or closes.
- The double-click interval is adjusted with the Speed slider.
At modern models mice in addition to the buttons have a wheel. It is used to scroll through documents. If such a mouse is used, the Wheel tab appears in the Mouse Properties dialog box. It is useful if the computer is often used for working with texts. By setting the scroll switch to the specified number of lines, you can set the number of lines in the document that corresponds to turning the wheel by one click. An alternative option is the toggle Scroll one screen at a time. In this case, turning the mouse wheel is equivalent to pressing the PAGE UP or PAGE DOWN key,
Recently, you can see more and more special models of manipulators. They are distinguished by an increased number of buttons, two wheels or other unusual controls. The configuration of these tools is provided by specialized drivers.
In life, there are various situations in which some individuals gain access to personal computer user without his permission. It can be acquaintances, children or just wanting to play a joke. In addition, sometimes the cause is a virus that can change system settings.
In today's article, we will talk about how to set up a manipulator on the Windows 7 operating system. It should be noted right away that this is not a particularly complicated process.
Drivers
Optical mice, like other computer hardware, require the right software. Most likely, many users have noticed that the presented device is sold without driver discs, but the installation is still carried out. There are two options for how to properly configure the mouse on the Windows 7 operating system programmatically.
If the official Windows version 7, you should not worry, because the developers have thought of everything to the smallest detail. Thus, therefore, the operating system already has the drivers for the mouse that are needed. Simply insert it into the required slot and wait a while. The operating system will then notify the user that the installation was successful.
This variant of events is often used when the OS is using a low-quality pirated assembly. It is worth noting that the installation of the manipulator will still occur, but when activated wireless type devices or game models with many buttons will experience problems. Thus, it is recommended that you first look at the mouse model on the package, and then download the necessary drivers from the Internet. You can install them in the same way as any other program.
Buttons
Next, you should figure out how to properly configure the buttons on the mouse. The instructions that will be presented below are standard for configuring many parameters of this device. Thus, it is desirable to remember it. The instruction provides for the following sequence of actions:
1. Open the Start menu.
2. Go to "Devices and Printers".
3. Go to point 5. If it does not exist, you need to click "Control Panel" and select "Hardware and Sound".
4. Click "Devices and Printers". As a result, a window will open containing all the devices that are installed on the computer.
If the drivers were not previously installed, then the manipulator used, most likely, will not be displayed here. Then it is necessary right click mouse to the desired icon. Next, select "Mouse Options". A window will appear on the screen containing five tabs, each of which is responsible for how to configure the mouse on the Windows 7 operating system. The user needs to use the open tab.
Goes to "Button configuration". This item is responsible for assigning the main mouse buttons. When the user typically makes a “left click” with the index finger and a “right click” with the middle finger, the LMB can act as a right key when the pointer is set. At the same time, RMB performs the functions of the left button. Previously, the function was provided for the convenience of left-handers, but on the other hand, if the user has been working with his left hand since childhood, it does not make sense to change the assignment.
The speed of double-clicking is responsible for how quickly you need to press the LMB before activating a folder, shortcut, and so on. Thus, the lower the speed, the more time passes between repeated clicks. Even with the lowest speed, you can click at any frequency, because it will still be counted. One of the most useless features is sticky. When it is activated, it is necessary to hold down the mouse button for a few seconds so that a frame appears, designed to select an area. True, it will be faster to use a standard selection.
Decor
When familiarity with the functional purpose of the mouse has occurred, you can go to visual effects. How can I customize the mouse on the Windows 7 operating system in a style that I like? After repeating the procedure from the previous paragraph, it is worth going to the "Pointers" tab. This will display a window that can be easily divided into two parts:
List with pictures (here you can see the visual design of the manipulator pointer for different actions in the current configuration);
drop-down list (various design schemes for manipulator pointers are displayed here).
You just need to click on them and choose what you need. It is worth noting that such "sets" can be found on the Internet and downloaded.
Options
The next step is to set up the pointer. When you go to the "Pointer Options" tab, you can see the following customizable characteristics:
- movement speed (in previous versions OS, this parameter was called sensitivity);
- "Initial position in the dialog box" (when opening the dialog box, you can automatically move the mouse pointer to the button that is selected by default);
— visibility of the pointer (suitable for people with poor eyesight).
Users can often lose sight of the pointer. Thus, it is proposed to use the settings to activate the loop behind the mouse or turn on the signal that notifies the position of the pointer.
Wheel
Oddly enough, it also requires configuration. True, in this case not many options. It is only possible to specify how many lines the screen will scroll by when the mouse wheel is rotated. This is set in the corresponding tab. You can customize several lines at once or the entire page. In this case, everything is individual. It depends on the taste and habit of the user. If the computer has been used for a long time, it is better to leave this setting unchanged. Otherwise, it's worth experimenting with different options to find the one that works best. Currently, horizontal scrolling is almost never used.
Macro
This is one of the most interesting settings for any mouse. What does she represent? In fact, this is a sequence of commands that is activated when one button is pressed. This is especially useful in games. For example, the user presses one button, and the game character performs a series of shots, reloads, and also acquires ammunition. And all this happens in just a second. How is it proposed to set up macros on the manipulator?
You can use the IntelliType Pro program, but it is not efficient enough, so you cannot do without special knowledge in setting up macros. The best option is to use third party application. For example, Oscar Mouse Editor. The presented utility makes it possible to assign mouse buttons to any model, increasing the number of operations per second and creating a macro on an intuitive interface. In addition, this software initially has several macros that are most actively used in games.
Laptop
operating room Windows system 7 is a unified platform that initially contains drivers for any hardware where it is installed. It doesn't matter if it's a computer or a laptop. This allows the user not to look for how to set up a mouse on a laptop. After all, all parameters and settings change in the same way as on a computer. In other words, everything happens as described above.
The topic of customizing a mouse equipped with several buttons was not touched upon. True, additional buttons are useless until it is installed on the computer. additional program. In addition, you will need to assign macros. If this is not done, they can only be used for games.
Games
If attempts are made to customize the mouse for a game or a specific application, this is done in the toy itself. Today, more and more projects are available where management is not subject to change. True, in many games the user does not have options. It remains only to configure the mouse yourself. As for games, their path to the implementation of such an action, as a rule, looks the same (“Settings” - “Controls”). It then displays a list of all teams present in the game. It is enough just to change what t is required by clicking on the desired item and on the key with which it will be activated.
A modern computer cannot be imagined without such a device as a mouse. Since its invention, it has become an indispensable computer control device. They come in a variety of shapes, with two or more buttons, ball-operated and optical lasers. But each of them needs to adjust the speed of the cursor movement, depending on the user's requirement. Therefore, in the article we will look at the instructions for setting the mouse sensitivity in Windows 7, 8 and the popular Counter-Strike game.
The same is true for "Pointer Acceleration Improvement" directly below. Most professional shooters use a mouse sensor scan speed of 400 to 800 dpi with overshoots at the top and bottom. Even for high resolution monitors, 400 to 800 dpi is still enough to achieve pixel accuracy. As a rule, initially chosen values are better than interpolated ones, i.e. the sensor is calculated between the sensor.
Interpolated settings can lead to an unintended loss of accuracy. Unfortunately, however, it is not possible to make a general statement, but it depends on the individual sensor of the respective mouse. If you are not sure, you can search exact model mouse and sensor on the web. A semi-modern gaming mouse from the mainstream portfolio usually isn't at any stage of printing more significant issues, though.
Adjusting Mouse Sensitivity in Windows 7 and Windows 8
Windows 7
In order to change the mouse sensitivity in the operating system (for Windows 8, see below), you need to make a couple of simple changes.
To reduce the sensitivity, you need to drag the pointer to the left (1-2 bars are enough to get a noticeable decrease in speed). Conversely, to increase the speed, drag the slider to the right. From our experience, the most comfortable operation is at settings slightly above the middle (but if you are more comfortable working at a higher speed, you can set it higher).
But this is just a generalization, all intermediate forms are possible. Where are the advantages of one and the other? On low sensitivity, the mouse must be moved further to quickly look over the shoulder or sideways, so you need more time to aim your opponent away from the center of the screen.
For this purpose, it is easier with low sensitivity to accurately aim the pixel without shooting beyond the target. Enemy movement also tends to be more reliable and insensitive with crosshairs because they don't have to re-correct as often, because the higher sensitivity allows them to get off target or overcompensate with ease.
Windows 8
The setup process in Windows 8 is similar. Go to the control panel, find the item "mouse" and click on it.
In the window that opens, go to the pointer options tab and set the desired level of cursor movement speed.

Toward the end of the line, lower sensitivity is generally more consistent as smaller errors are not as big in weight, while high sensitivity allows for faster panning and movement but is more sensitive to small inaccuracies - the right combination, which is different for each person. Decide on frustration or fun while playing.
In order to provide you with all content in German, many articles are not translated by humans, but by translation programs that are constantly being optimized. However, machine-translated texts are generally not perfect, especially in terms of grammar and use of foreign words, as well as specialized covers. Microsoft makes no warranties, implied or otherwise, regarding the correctness, correctness, or completeness of the translation.
Changing Mouse Sensitivity Using the Drivers Snap-in
A4tech drivers
In order to change the sensitivity of the A4tec mouse using the snap-in, run the "properties" by right-clicking on the tray icon of the operating system.

In the settings window that opens, go to the "Movement" tab and in the "Cursor movement speed" section, drag the slider to determine the most convenient sensitivity. Click "OK" to save.
Method 2: Remove the conflicting mouse
It is not responsible for any problems that may arise directly or indirectly from translation errors or the use of translated content by customers. This may be due to the following reasons. The application does not recognize the mouse pointer correctly. . If the issue persists, try the following methods. The receiver is trying to use different ports to resolve connection problems. . Start your computer using a clean one. These programs include an antivirus and a system that can interfere with mouse operation.

Logitech drivers
Changing the mouse sensitivity settings from Logitech is done in the drivers menu, on the "Mouse Movement" tab. In order to change the settings, select its model in the "Select a mouse" field and in the "Pointer speed" item, change the sensitivity to your liking.
Method 5: Determine if it's a specific app
If you perform a clean reboot before running the installer, you will prevent these programs from starting automatically. Double-click "System", open the "Hardware" tab and select "Device Manager". In the Device Driver Update Wizard dialog box, click Next. Click to display a list of known drivers, and then click Next. Select a mouse and click next. Click "Next" to make sure you have chosen correct driver. Click "Finish" to complete the installation of the new driver.
- Click "Start", select "Default Settings" and click "Control Panel".
- Double-click and expand another direction branch.
- Click and select "Properties".
- On the Drivers tab, click Update Drivers.

Setting the speed of mouse movement in games
Mouse sensitivity in online games is one of the most important parameters for avid gamers, because a second of delay can turn the player into the death of his character. To adjust the mouse sensitivity in games, there are separate menus, consider one of these games - Counter strike. To do this, go to the game settings by selecting the "Options" menu item.
For example, they can ignore partial scroll events, or interpret a partial event as a full row. Instances of some programs that actually combined these misbehaviors. For example, some programs may ignore positive partial events, and negative full-line partial events will handle slower forward scrolling and fast backward scrolling.
This issue may occur for the following reasons. The mouse settings have been changed manually or by another program so that one mouse click sends a command with multiple mouse clicks.
- You didn't accidentally double-click instead of single-click.
- Mouse drivers are corrupted.
- The mouse hardware is faulty.
IN this menu go to the "Mouse" tab and in the "Mouse sensitivity" section, select the desired option that will allow you to control the character with maximum convenience. Changing mouse settings exists in almost every game, and you can find them in the settings.

This lesson will show you how you can change mouse sensitivity inWindows 7-Vista-XP. If you do not know what it is yet, you can read about it in our dictionary at the link below:
Method 1
In this case, refer to the product documentation for instructions on how to perform these steps.
Mouse test in several programs
If the problem only occurs in specific program, run the troubleshooter for that program. Probably the mouse commands are adapted in this program. In the Method section. Method 3: Test your mouse in safe mode- Click "Start" and then "Disable".
- In the Turn Off Computer dialog box, click Restart.
And so, now you should already know exactly what mouse resolution is, and we can continue.
To start setting up, you need to open the mouse options window, this can be done in several ways, I will give two of them for Windows 7 (Vista) and one for Windows XP.
- Open the start menu and select "Control Panel/Hardware and Sound/Mouse" See the screenshots below:
- Or open the Start menu, type "mouse" in the search field and press Enter, or select it from the search results.

Method 4: Troubleshooting the software
If the issue does not occur in safe mode, software will probably not work correctly. Continue method 4.
Check your desktop settings
Quit all background programs. Reset tiles to default values. If the problem occurs only in a specific program, click the Options button, select that program, and then click Restore Defaults.Method 5: Check your mouse hardware and try replacing mouse ports if possible
Method 6: Test the mouse on a different computer, or test a different mouse on a computer. If the mouse problem persists, you may need to repair or replace the mouse. If the problem continues to exist, the cause is likely to be in the software.- Click "Start", select "Settings Control Panel".
- Double-click Add or Remove Programs.
- Version 2 or earlier Click Finish, and then click Close.
- Follow the installation instructions.
- Restart your computer when you request.
- Click Start, select Settings, then Control Panel.
- Double click.
- On the Keys tab, click Restore Defaults.
- Test the mouse under test on a working system.
- Try using a mouse on the appropriate computer.
- Those who have Windows XP need to open the Start menu, select "Control Panel / Mouse".
Let's continue, you have opened a window with mouse settings, go to the "Pointer Options" tab. In this tab there is a "Movement" field, in which the sensitivity of the mouse is configured.

Move the slider left and right, and then check if the sensitivity has changed for the better (according to your needs). It is better to leave a tick on "Enable increased pointer precision", this function increases the accuracy of the mouse pointer. When you have chosen the most suitable value, click the "OK" button to save the changes.
Quickly open apps with hotkeys
It's annoying when keyboard shortcuts for important programs don't work because they're already taken by the operating system. In this article, you will learn how to customize the global keyboard shortcuts to your liking. Customize the keys to launch your most important applications. First, you need a link to the application. A menu will appear where you select "Create Shortcut" here. In shortcut properties, assign global keystrokes to executable files.
Mouse Adjustment Practice
Click the link to the right and select Properties. On the shortcut tab, place your cursor in the Keyboard Shortcut field and enter the shortcut you want to use. If you find that your newly created abbreviation conflicts with another, simply delete the shortcut or enter a new keyboard shortcut.
The steps to adjust the mouse sensitivity can be done indefinitely, so don't be afraid to save a certain sensitivity value and try to play with it a bit. And if you don't like it, then you can always go into the mouse settings and change the pointer sensitivity to a new one or the one you are already used to working with. The main thing is not to be afraid to experiment.
Edit the global key combination in the registry
After restarting the system, the error was fixed. The program is also available in a portable version that you do not need to install. So first make sure you understand. In the left upper corner select the key combination you want to learn. Now click "Check active hotkeys" in the bottom left corner and you will get a list of available keyboard shortcuts. Programs that use these key combinations get nothing. This is a key management method. This way you can switch between desktop and tile surface.